Template Editor
The editor is where you fine tune your template design after the initial wizard setup. It is divided into the main area with pass previews and a side panel where various editor appear.
Side panel
Section titled “Side panel”On the right hand side you’ll find panel where you can edit items not directly related to something you can see and click on the pass previews.
Colours
Section titled “Colours”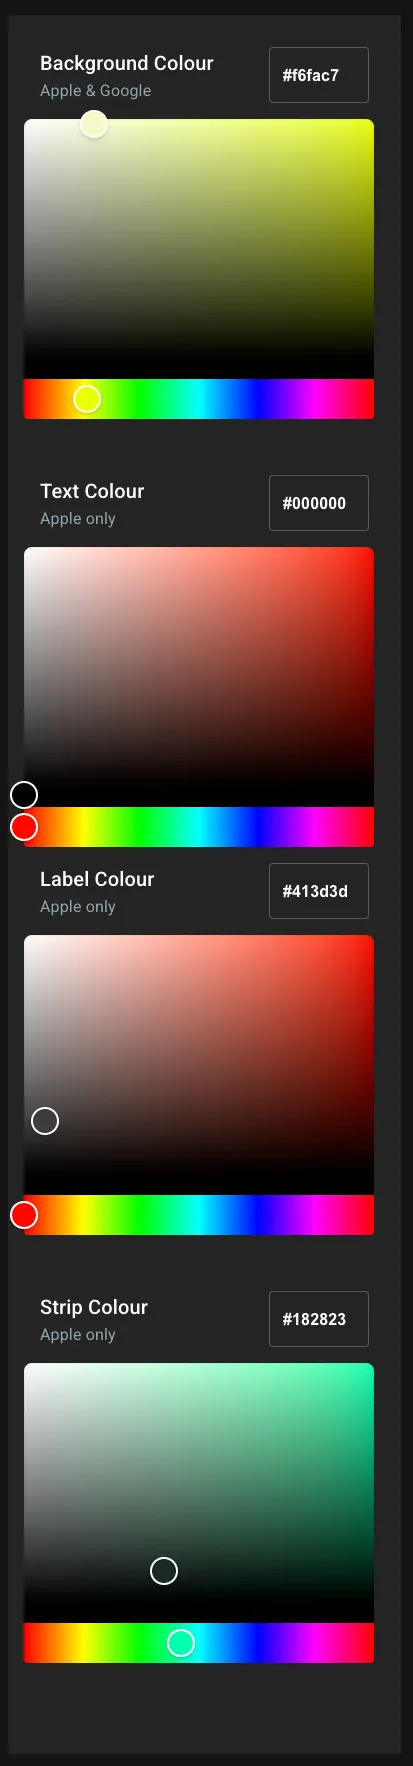
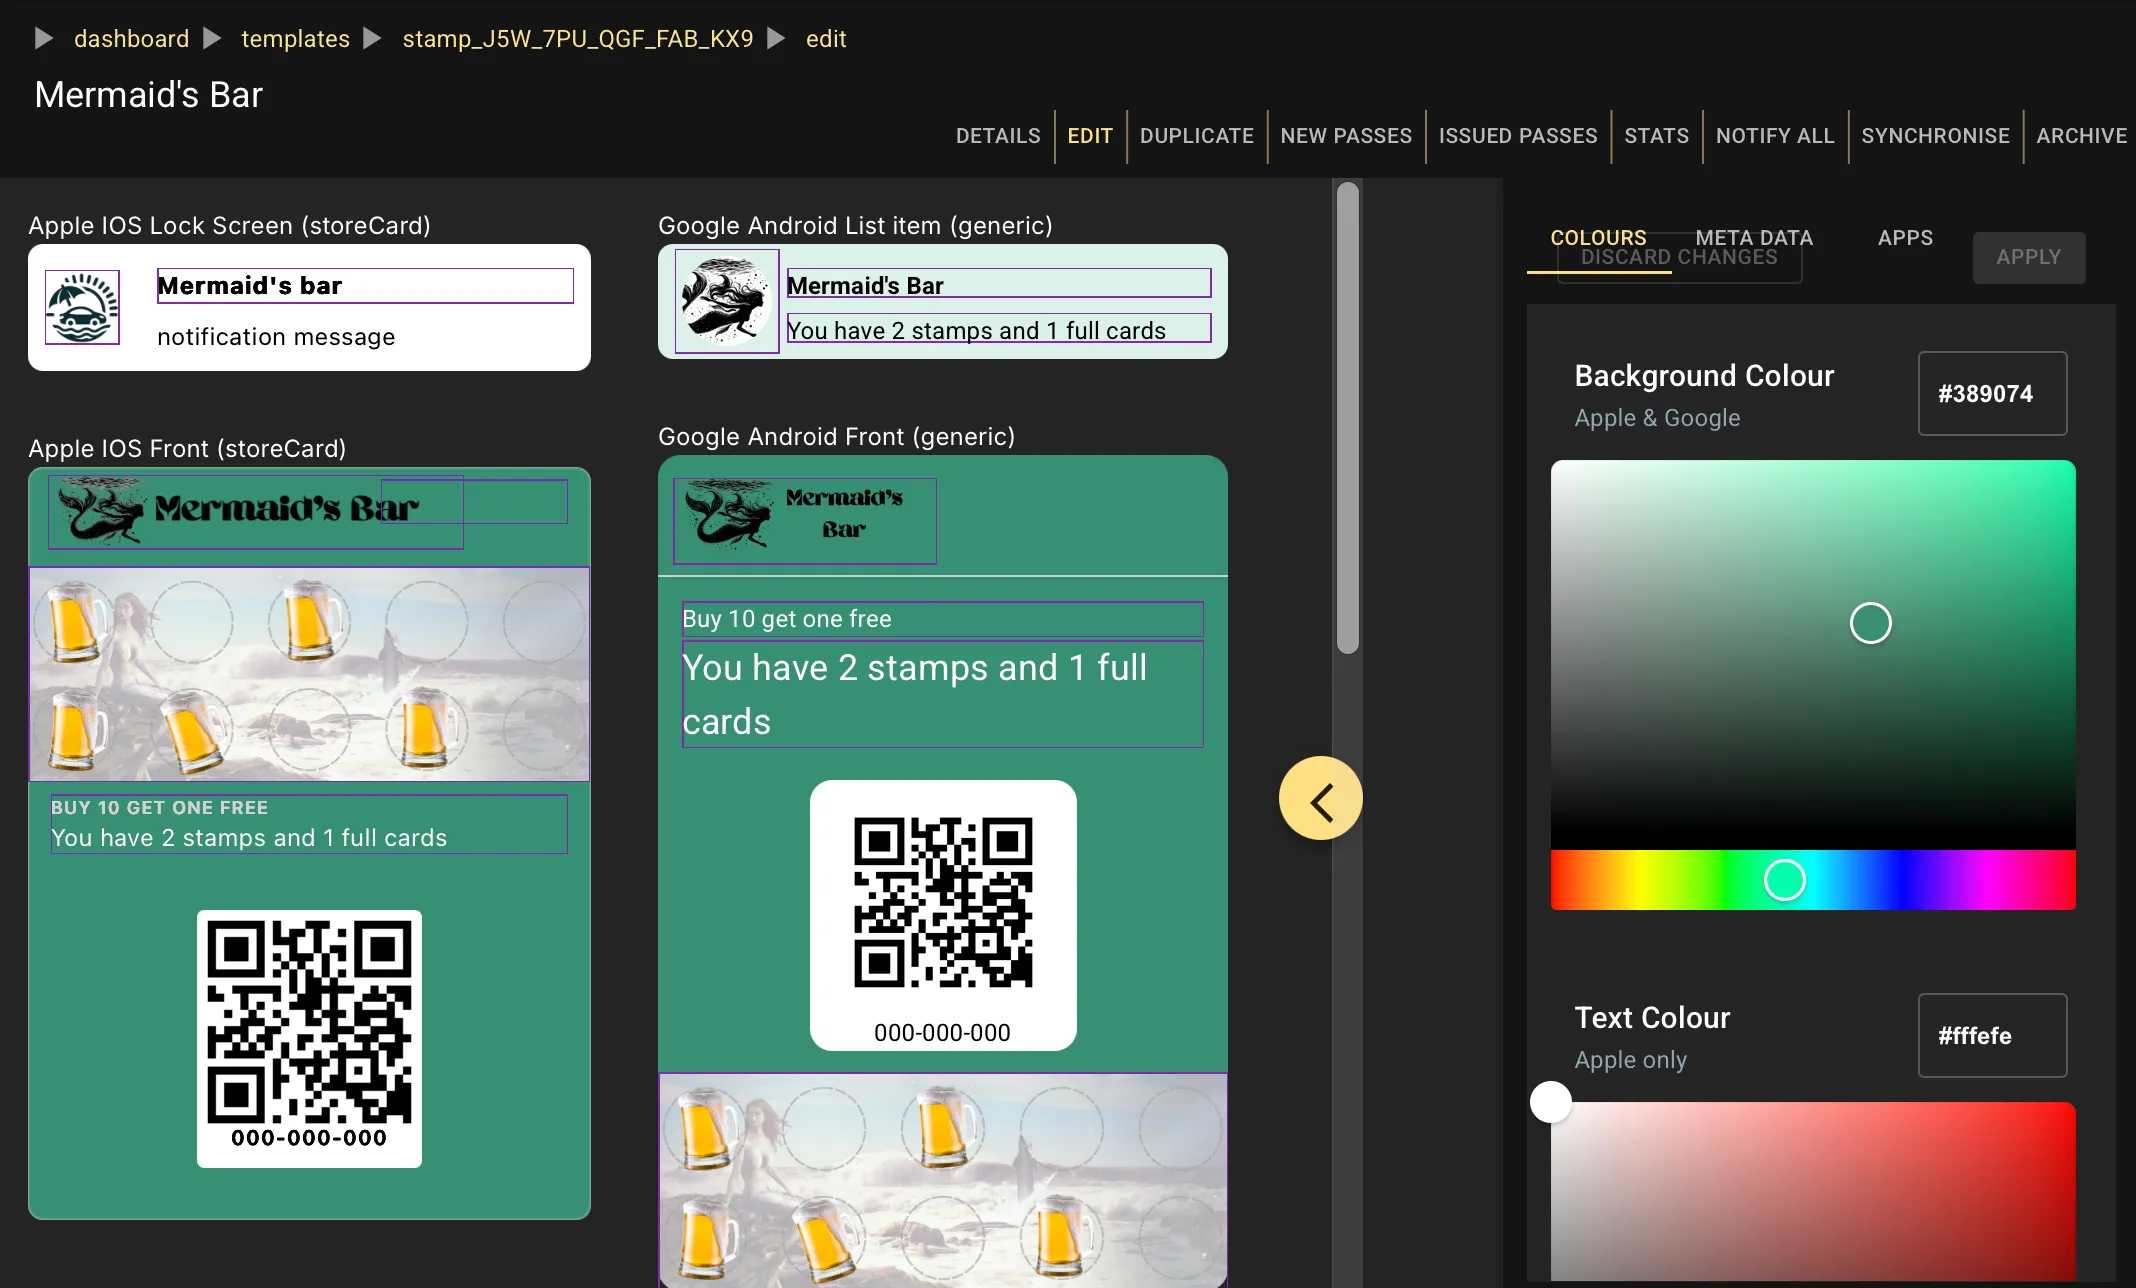
Background colour is applicable to both Apple and Google. Either use the picker, or type in a hex colour value.
The other colours apply only to Apple passes. Google will automatically choose either black or white for text, whichever contracts the best with your background colour.
You will see foreground (most text other than labels) and label colour. If you have a strip image you’ll also see a picker for strip colour. This is the primary field text that overlays the strip image.
If you change the colour a popup preview of the pass appears so you can see the result without having to commit the change.
Meta data
Section titled “Meta data”In the meta data panel you’ll find a few essential settings:
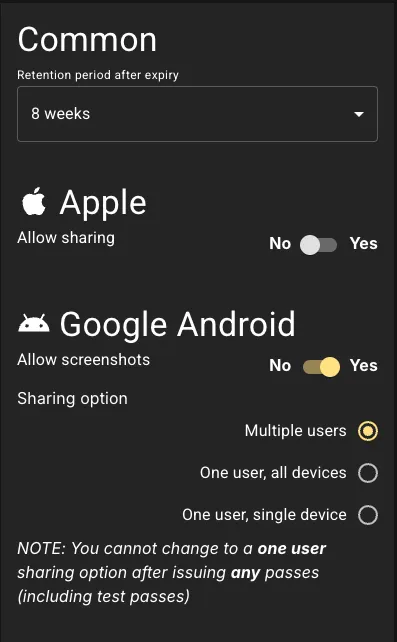
- Retention period : This set how quickly Smartix will automatically delete a pass after it expired (if it has an expiry date). See Active Passes for more information.
- Apple - allow sharing : This determines whether Apple shows the sharing icon on the pass. It does not prevent sharing by other means
- Google - allows screenshots : If set to no, then users will be unable to screenshot a pass.
- Google - sharing : Google has three sharing options. The default to to allow a pass to be installed on multiple devices by any number of users. This equates to how Apple passes work. ALternatively you can set a pass to be installed on any number of device logged into a single user’s account, or only a single device. There are downsides to limiting pass installation: you will need to manage instances where customers change account or replace devices.
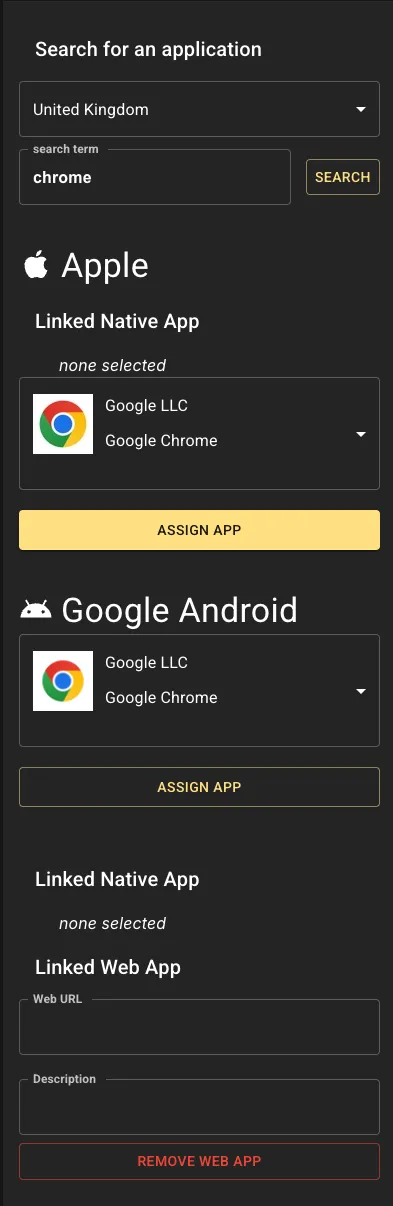
If you have a native Apple or Google App that you wish to be advertised in your pass then you can attach it to your passes here. Just search for your pass and select the relevant one from the lists.
Other editor panels
Section titled “Other editor panels”As you select content on the pass previews, other editor panels will overlay this one. Each panel will be relevant to the particular content you are editing.
Text editor
Section titled “Text editor”Some fields have content that can only be set at the template (not individual pass) level. Clicking on these will open the text editor. An example would be the top (bold) item in the Apple lock screen preview. Just type in the text you want.

Field editor
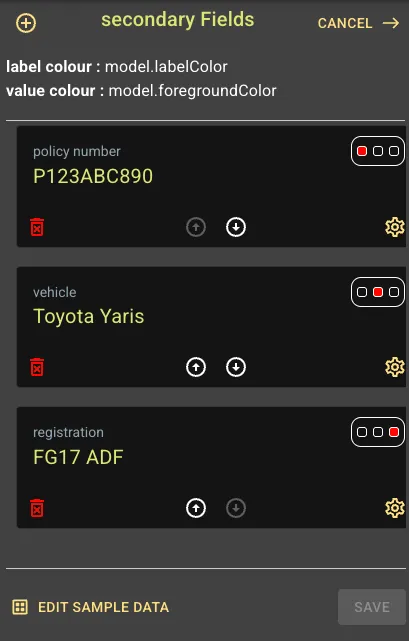
Section titled “Field editor”The field editor handle most text items. You’ll inititally see the list view (most field support more than one item, so the list shows you all the items in the list.)
You may be one item here, several or none depending upon your existing content.
Click the (+) icon to add a field. If the icon is greyed out then you already have the maximum permitted number of items.
Each item shows the label and content (if set). Click the trash icon to delete an item and the arrow icons to move items up/down (left to right in for front fields). Click the label/content or settings icon to open the editor for that item.
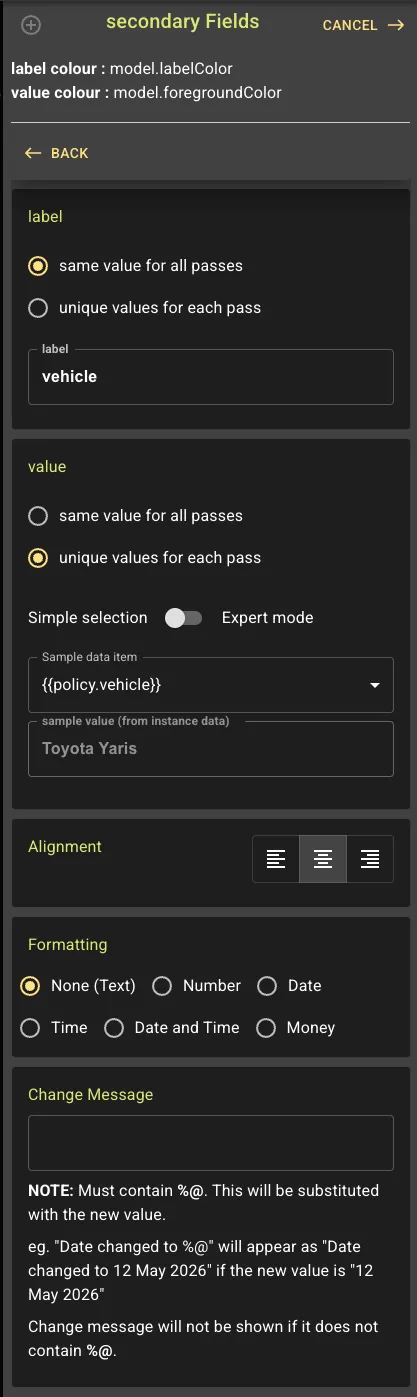
Here you see a typical field editor. The exact content you will see depends on whether you are editing an Apple or a Google field, a front or back field, and currently selected option.
At the top of the label and content fields you will see a selector: “same value for all passes” or “unique value for each pass”. Selecting “same value for all passes” means the value you type in will be shown on every pass you issue.
Selecting “unique value for each pass” will open an extra drop-down where you must select a data item. This represents an item that you must provide whenever you create a pass. The pass will have the content you provide in your data file. Each template has a sample data file and the value in the sample data will be shown in the editor.
Text alignment (Apple front fields only)
Section titled “Text alignment (Apple front fields only)”
Google automatically aligns left items to the left, center items middle and right items to the right. Alignment does not apply to back of fpass fields.
Formatting
Section titled “Formatting”
Various options are provided for formatting your data. We have replicated the Apple options for Google passes where we apply the formatting ourselves.
Change message
Section titled “Change message”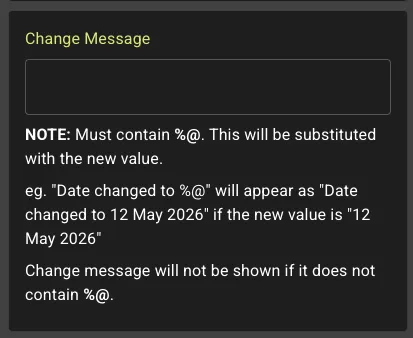
If you supply a change message for a field then Apple will display and alert if you change that field’s value with a pass update. For this to work you must include %@ in your message.
So, for example if you have a field that a time value for a show time. You might set the change message to “Performace time changed to %@ for Aladin”. If you later changed the value to 19:55 for Aladin, then the alert would read “Perfornace time changes to 19:55”.
At minimum your message can be just %@ in which case the new value is shown without any context.
If you omit %@ then Apple will display a genric change message such as “storeCard updated”.
Image editor
Section titled “Image editor”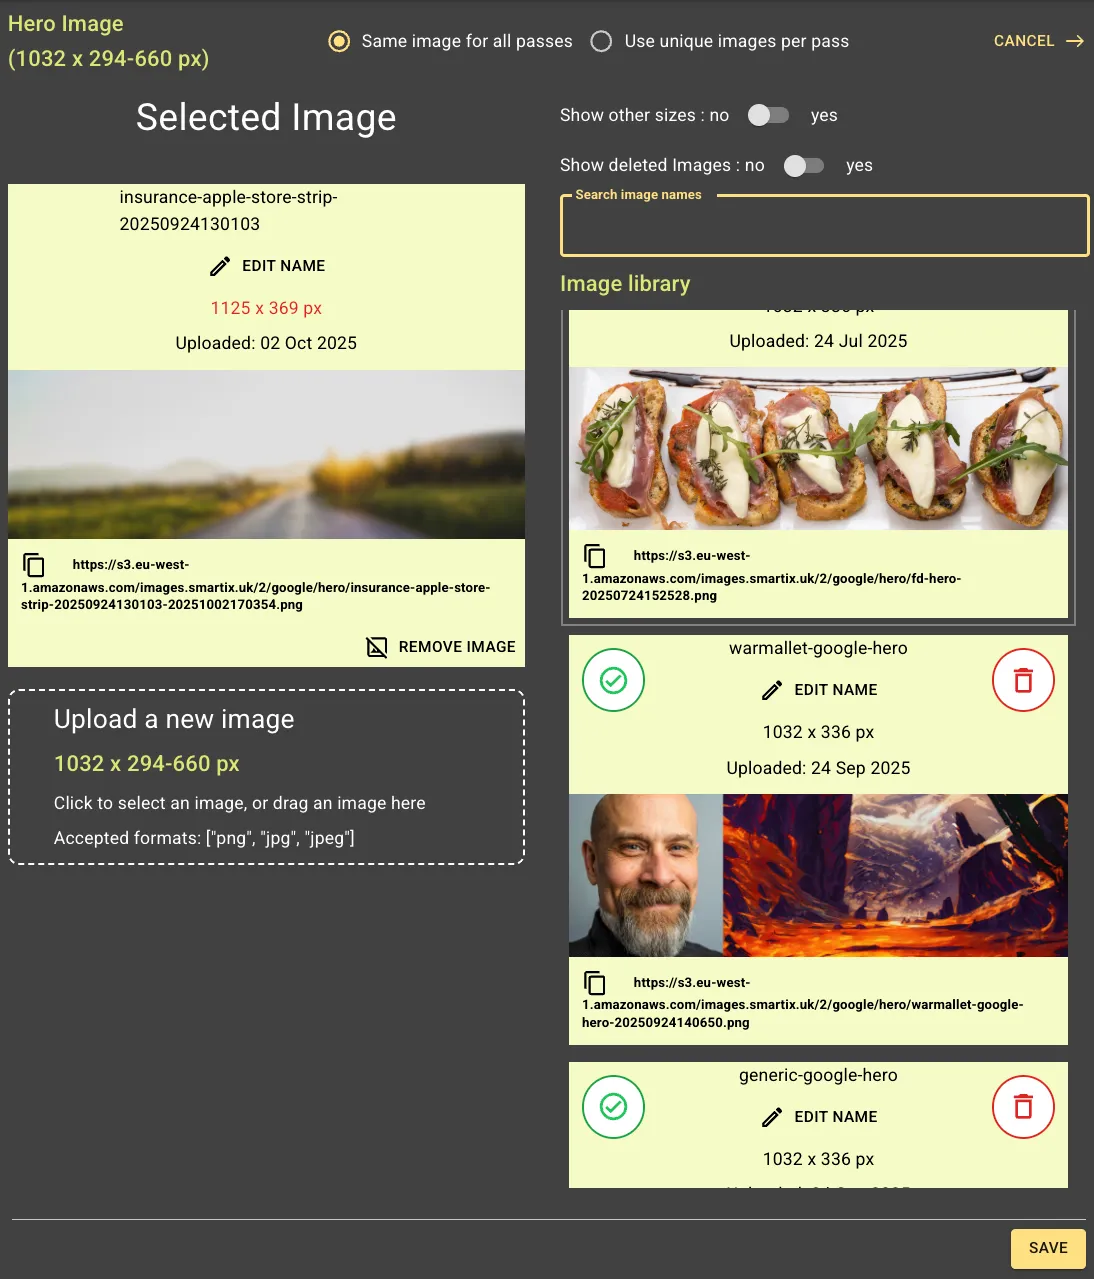
Clicking an image (or image placeholder) opens the image editor. Here you can select an image from your library, or upload a new one. The popup will show you the expected size for the image. You can use images of other sizes if you wish, but they will be resized with a resulting loss of quality.
Images are never deleted (they might still be used by a previously issued pass!), but they are hidden from view. Select show deleted images to view them where you can easily undelete an image in order to use it.
Use the search to help you locate an image by filename. To upload a new image either drag an image from your desktop onto the dashes area, or click that area to open a file selector window.
If the image you are editing is not a mandatory one (Apple Icon, Apple Logo and Google Logo are all required), then you can remove the image by clicking the button on the current image.
If you are editing one of our Managed stampcards then you’ll see a selection of iamges (one image per stamp). Ensure you select an appropriate image for each one.
Barcode editor
Section titled “Barcode editor”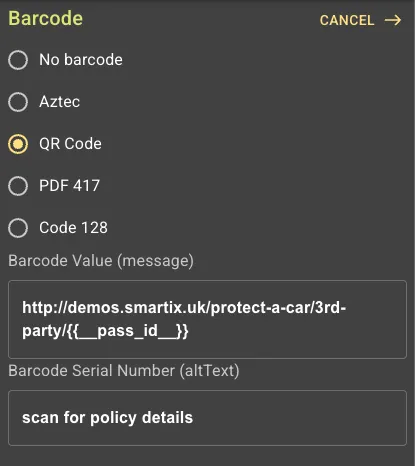 Click on a barcode to open this editor. You can select which type of barcode to use (or none).
Google does support more barcode formats, but we have limited the list to those also supported
by Apple.
Click on a barcode to open this editor. You can select which type of barcode to use (or none).
Google does support more barcode formats, but we have limited the list to those also supported
by Apple.
The setting you choose here is applied ot both Apple and Google passes. You do not have to set them separately.
The value for the barcode is always taken from instance data:
- __barcode__.__value__ : barcode content
- __barcode__.__text__ : text to show beneath the barcode
Pass previews
Section titled “Pass previews”On the left you see a visual representation of both Apple and Google passes. The small section above the pass fronts show a smaple Apple lockscreen message and how the pass appears in Google’s list view. If you scroll down you’ll find the back of pass views for each.
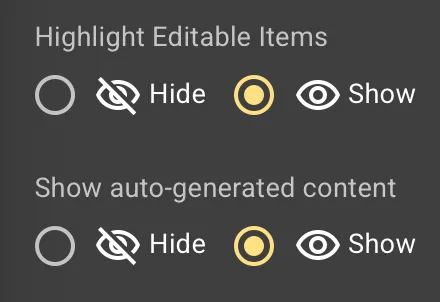
Options
Section titled “Options”Open the settings (icon top right, of your window) where you can toggle two useful settings:
-
Highlight editable items : Displays a colour changing box around editable fields. This is very useful if that field doesn’t currently contain any content. It also displays placeholders for images if you do not already have an image.
-
Show auto-generated content : Apple and Google include additional content in your passes. You can toggle whether you want to see that in the preview, or excldue it so you can focus on the ediable content.
Field highlighting shown / hidden
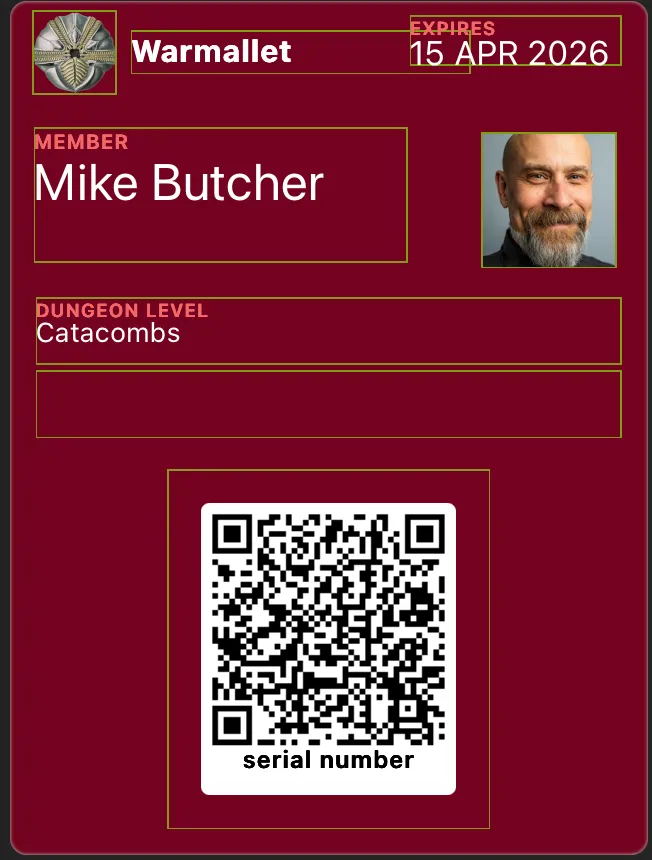
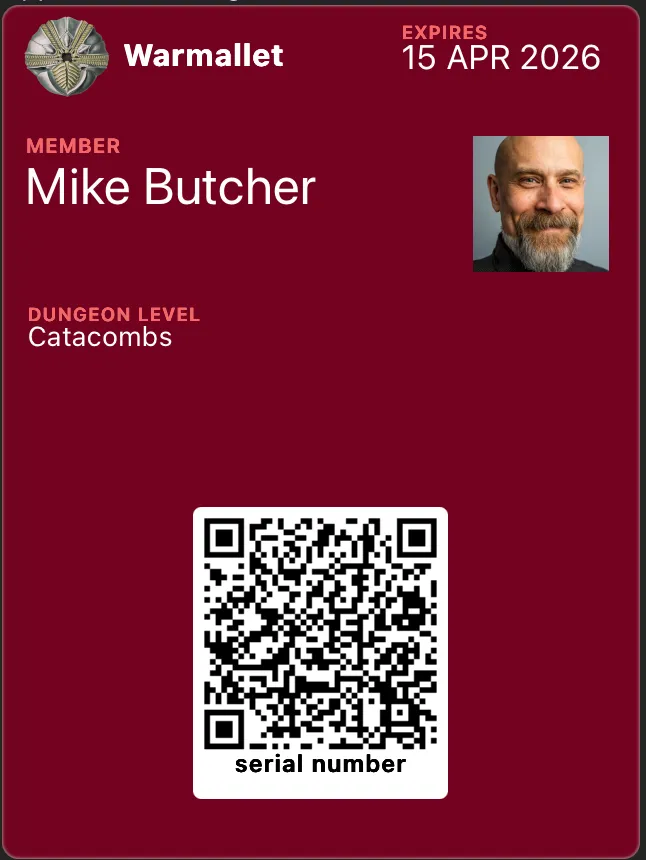
Apple auto content hidden / shown

Google auto content hidden / shown
Editing fields
Section titled “Editing fields”To edit any of the text fields, just click on the exiting text, or the empty field. Use the options above to highlight empty fields if needed. Then edit the field as described above.
Editing images
Section titled “Editing images”Similarly, to select or change an image, simply click on the existing image, or the placeholder icon (you need highlight editable items turned on to see this) to open the imag eeditor
Editing barcode
Section titled “Editing barcode”Barcodes are just the same, click the barcode or the empty space to open the barcode editor.